How To: Map Network Drives (PC & Mac)
Map a network drive to get to it from File Explorer in Windows without having to look for it or type its network address each time.
Open File Explorer from the taskbar or the Start menu, or press the Windows logo key + E.
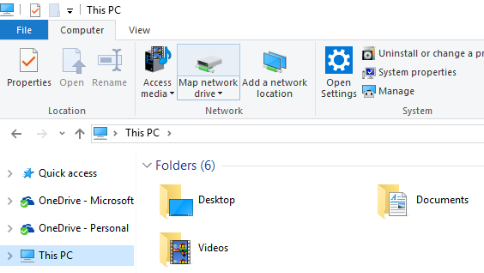
Select This PC from the left pane. Then, on the Computer tab, select Map network drive.

In the Drive list, select a drive letter. (Any available letter will do.)
In the Folder box, type the path of the folder or computer, or select Browse to find the folder or computer. To connect every time you sign in to your PC, select Reconnect at sign-in.
Select Finish.
Note: If you can't connect to a network drive or folder, the computer you're trying to connect to might be turned off, or you might not have the correct permissions. Try contacting your network administrator.
Map a network drive to get to it from File Explorer in Windows without having to look for it or type its network address each time.
Open File Explorer from the taskbar or the Start menu, or press the Windows logo key + E.
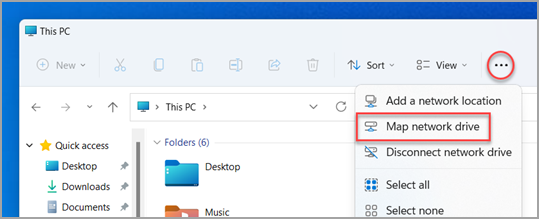
Select This PC from the left pane. Then, on the File Explorer ribbon, select More > Map network drive.

In the Drive list, select a drive letter. (Any available letter will do.)
In the Folder box, type the path of the folder or computer, or select Browse to find the folder or computer. To connect every time you sign in to your PC, select Reconnect at sign-in.
Select Finish.
Note: If you can't connect to a network drive or folder, the computer you're trying to connect to might be turned off, or you might not have the correct permissions. Try contacting your network administrator.


Related Articles
Why Do I Need to Restart My Mac Every Week?
Restarting your computer helps keep it running smoothly. It clears the active memory (cache), stopping any tasks that are eating up RAM. Even if you’ve closed an app, it could still tap your memory. A restart can also fix peripheral and hardware ...How To: Configure Forticlient VPN
How To: Configure Forticlient VPN Open Forticlient: On Mac from Applications, Desktop Shortcut, the Menu Bar (upper right near wifi icon), or the Dock. On PC from Apps, Desktop Shortcut or System Tray (lower right triangle near the clock). ...Adding Printers via Kandji Self Service
Adding Printers via Kandji Self Service Printer drivers are preinstalled, all you need to do is download the configuration for the printer(s) you need. Feel free to install any of them and let us know if you run into any issues. Best Practices for ...Duo Authentication for macOS Logon
Duo Authentication for macOS Logon Duo Authentication for macOS Logon prompts for secondary approval when you log in to your Mac. Instructions can be found on the Duo WebsiteWhat is SSID? Wifi!
The term "SSID" stands for "Service Set Identifier", which is a case sensitive, alphanumeric character with a unique identifier. Essentially it is the name that identifies a wireless network. SSID's used here include: museum: the open wireless ...